How to take a website screenshot using Google Apps Script
Here you will find a ready-made solution - how to create an automatic website screenshot for your tasks. It will be possible to save it to a folder on Google Drive, as well as record all the information about it in a Google Spreadsheet (the date and time the screen was created, a link to the site and a link to the screenshot in Google Drive).
The method does not require programming skills from you! It is enough just to be attentiveness when following the step-by-step instructions that you will find below.
Creating automated screenshots used for many tasks:
- Track changes to the site (example: when placing buttons or other functional elements, when adding content, etc.).
- Fix pages before any large-scale actions for the possibility of visual comparison "BEFORE/AFTER" (example: when completely replacing the design or content).
- Use for offline analysis of the website (example: if necessary, analyze usability, visual and functional elements, content).
- Check the correspondence of the content on the pages with the URL specified for relevance analysis.
- Check the correctness of the site display on different screens; compare the design and layout of the website from desktop and mobile devices.
- Archive websites or individual pages as screenshots.
Moreover, for any other tasks for which it is necessary to create screenshots of individual pages or the entire site.
Therefore, to get automatic screenshots of website pages, you will need Pikwy screenshot service and a cloud service for creating Google Apps Script executable functions.
If you are not familiar with Google Apps Script tools, then first we will try to briefly explain the essence and functionality of this product. Then we will give instructions on how to use it to automatically created screenshots for your tasks.
What is Google Apps Script and how to use it to get auto-screenshots
Apps Script - is a cloud-based JavaScript platform for automating and integrating various tasks using products from Google.
In simple words, the service provides a ready-made tool for running executable functions (scripts) and obtaining the information you need in a convenient form for use.
We have created a ready-made script that receives a screenshot via Pikwy and then saves it to your folder on Google Drive, and, if desired, writes information about the screen to Google Sheets (date and time the screenshot was taken, as well as a link to the site and to the screen in the folder on Google Drive).
In addition, to run it, you only need attentively follow the detailed instructions.
Instructions for writing a script on Google Apps Script to create screenshots via Pikwy:
1. Go to the website of the Google Apps Script service (https://script.google.com/).
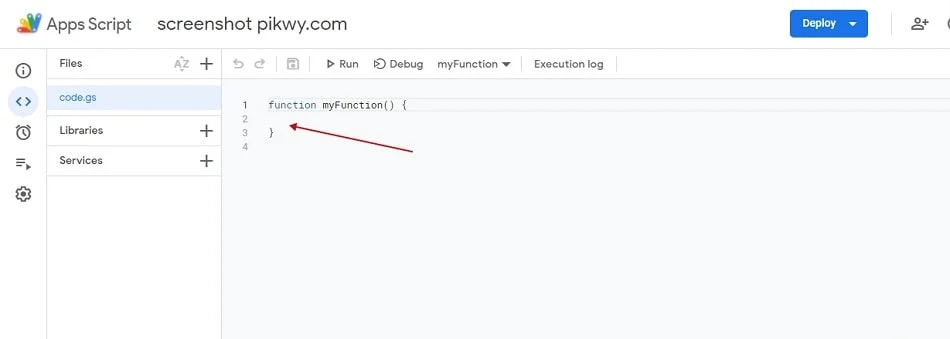
2. Click the "Create project" button and in the top line fill in the field, which by default called "Project without a name" - enter the unique name of your project there.
3. Then paste the desired function (below in the article you will find ready-made function codes) and save it.
4. Now, you need to go to your account on our screenshot service //pikwy.com/ with an active subscription or activated free trial access for 7 days. If you are not registered, please register, it takes about 1 minute).
5. Next, in your account on pikwy.com, you need to add a new token in the "Tokens" section.
6. Now you need to go to your Google Drive cloud storage account (https://drive.google.com/), create a folder. Then go to this folder and copy the folder ID from the address bar (these are the characters after the last slash).
Example:
If the full address of the folder – https://drive.google.com/drive/u/0/folders/1iVbO4dzPelIqGwqaVI4Sddqa16fWtdSYn
Therefore, the folder ID is 1iVbO4dzPelIqGwqaVI4Sddqa16fWtdSYn
7. If you need all the information (the date and time the screen was created, the link to the site and the link to the screenshot in Google Drive) to be recorded in Google Spreadsheet, then you need to create an empty Google Spreadsheet in this or any other folder, and then take it too ID (in the same way as in the previous paragraph).
8. If you have a lot of web-sites for which you need to take screenshots, then for this you need to create another Google Spreadsheet and copy all the links to column A1 so that they come out vertically, and then also take its ID (in the same way as in the previous paragraph ).
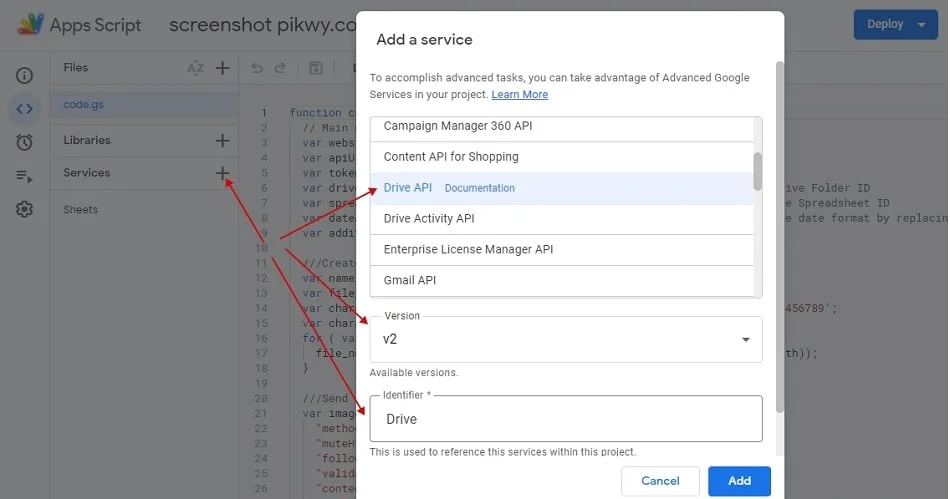
9. In order for the script to save the image in Google Drive and Google Sheets, be sure to add these services to the Google Apps Script cloud service section. This is necessary so that the script can interact with them (i.e. use them to save information). If you do not add Google Drive, the script will not be able to save screenshots! If you do not add Google Sheets, the script will not record data in your table.
To add services, you need to click the “+” sign next to the “Services” line, after which a window will open with a list of available Google services:
- To add Google Drive - select Drive API from this list, specify V2 version and Drive indicator below.
- To save to Google Sheets - add from the Google Sheets API list, specify the V4 version and Sheets ID below.
10. Next, we proceed to create the executable part of the script for creating automatic screenshots. You do not need to program anything! To run the script, you only need to copy the ready-made parts of the code and add your individual data to the appropriate blocks:
Main parameters section
function captueScreenshot() {
  // Main parameters
  var apiUrl = "https://api.pikwy.com";
  var token = "YOUR TOKEN";
  var driveFolderId = "DRIVE FOLDER ID"; // Google Drive Folder ID
  var spreadSheetId = "SPREADSHEET ID"; // Google Spreadsheet ID
  var dateAndTime = new Date().toLocaleString('en-US'); ///You can change the date format by replacing en-US
  var parsingUrlSpreadSheetId = "PARSING SPREADSHEET ID"; Spreadsheet ID with links
var numberThreads = 10; ///The number of concurrent requests to take a screenshot. Depends on your chosen plan.- In the websiteURL parameter - enter the URL of the site you want to take a screenshot.
- In the token parameter, insert the token from the Pikwy.com service that you created in step 5.
- In the driveFolderId parameter, paste the folder ID you got in step 6.
- In the spreadSheetId parameter, paste the Google Sheets ID you got in step 7.
- In the parsingUrlSpreadSheetId parameter, paste the Google Sheets ID you got in step 8.
- In the numberThreads parameter, specify the number of simultaneous requests for creating screenshots. Depends on the plan you choose.
The Read data from Google Spreadsheet section is responsible for reading links from Google Spreadsheets
  /// Read data from Google Spreadsheet, A1 colomn
  var parsingUrlLastRow = SpreadsheetApp.openById(parsingUrlSpreadSheetId).getActiveSheet().getLastRow();
  var parsingUrls = SpreadsheetApp.openById(parsingUrlSpreadSheetId).getActiveSheet()
  .getRange("A1:A"+ parsingUrlLastRow).getValues();
The Additional options for taking a screenshot section is responsible for resolution, delay before creating a screenshot, etc. You can find detailed information about all supported parameters of the Pikwy screenshot service on the API page https://pikwy.com/api
  let formData = {
	///Additional options for taking a screenshot
        'u': encodeURIComponent(parsingUrls[i]),
        'tkn': token,
        'f':'jpg',
        'width':'1500',
        'height':'2000'
      };
In the section Create a random filename in the "namelength" parameter - if you wish, you can change the length of the random name of the screenshot.
  ///Create a random filename
  var namelength = 30;
  var file_name = '';
  var characters = 'ABCDEFGHIJKLMNOPQRSTUVWXYZabcdefghijklmnopqrstuvwxyz0123456789';
  var charactersLength = characters.length;
  for ( var i = 0; i < namelength; i++ ) {
    file_name += characters.charAt(Math.floor(Math.random() * charactersLength));
  }
The Send request section is responsible for sending your data to pikwy.com
  ///Send request
  var image = UrlFetchApp.fetch(apiUrl, {
		"method": "GET",
		"muteHttpExceptions": true,
		"followRedirects": true,
		"validateHttpsCertificates": true,
		"contentType": "application/x-www-form-urlencoded",
		"payload": "u="+ encodeURIComponent(websiteURL) +"&tkn="+token+additionalParameter
	}).getBlob().getAs('image/jpeg').setName(file_name);
The Save screenshot to Google Drive section is responsible for saving the screenshot to Google Drive.
///Save screenshot to Google Drive
  var folder = DriveApp.getFolderById(driveFolderId);
  var file = DriveApp.createFile(image);
  Drive.Files.update({"parents": [{"id": folder.getId()}]}, file.getId());
  var driveImageUrl = 'https://drive.google.com/file/d/' + file.getId() + '/view';
The Insert data into Google Spreadshtee section is responsible for saving information in Google Spreadsheets
  /// Insert data into Google Spreadsheet
  var lastRow = SpreadsheetApp.openById(spreadSheetId).getActiveSheet().getLastRow();
  var insertData = [dateAndTime,screenshotUrl,driveImageUrl]
  SpreadsheetApp.openById(spreadSheetId).getActiveSheet().getRange("A"+ (lastRow+1)+":C"+(lastRow+1))
  .setValues([insertData]);
After copying the code snippets and filling in all the sections with your data, you should have the following function:
function captueScreenshot() {
  // Main parameters
  var apiUrl = "https://api.pikwy.com";
  var token = "YOUR TOKEN";
  var driveFolderId = "DRIVE FOLDER ID"; // Google Drive Folder ID
  var spreadSheetId = "SPREADSHEET ID"; // Google Spreadsheet ID
  var dateAndTime = new Date().toLocaleString('en-US'); ///You can change the date format by replacing en-US
  var parsingUrlSpreadSheetId = "PARSING SPREADSHEET ID"; Spreadsheet ID with links
  var numberThreads = 10; ///The number of concurrent requests to take a screenshot. Depends on your chosen plan.

  /// Read data from Google Spreadsheet, A1 colomn
  var parsingUrlLastRow = SpreadsheetApp.openById(parsingUrlSpreadSheetId).getActiveSheet().getLastRow();
  var parsingUrls = SpreadsheetApp.openById(parsingUrlSpreadSheetId).getActiveSheet()
  .getRange("A1:A"+ parsingUrlLastRow).getValues();

  /// Preparing data for a query
  var urlsArr = [];
  for(i in parsingUrls){
    if (parsingUrls[i] != false) {
      let formData = {
		 ///Additional options for taking a screenshot
        'u': encodeURIComponent(parsingUrls[i]),
        'tkn': token,
        'f':'jpg',
        'width':'1500',
        'height':'2000'
      };
      let headersParam = {
          "url": apiUrl,
          "method": "post",
          "muteHttpExceptions": true,
          "followRedirects": true,
          "validateHttpsCertificates": false,
          "contentType": "application/x-www-form-urlencoded",
          "payload": formData};

      urlsArr.push(headersParam);
    }
  }

  var splitUrlsArr = [];
  for (let i = 0; i < urlsArr.length; i += numberThreads) {
      const chunk = urlsArr.slice(i, i + numberThreads);
      splitUrlsArr.push(chunk);
  }

  for(i in splitUrlsArr){
    var responses = UrlFetchApp.fetchAll(splitUrlsArr[i]);
    for(b in responses){
      if(responses[b].getContentText().length > 1000){
          ///Create a random filename
          var namelength = 30;
          var file_name = '';
          var characters = 'ABCDEFGHIJKLMNOPQRSTUVWXYZabcdefghijklmnopqrstuvwxyz0123456789';
          var charactersLength = characters.length;
          for ( var c = 0; c < namelength; c++ ) {
            file_name += characters.charAt(Math.floor(Math.random() * charactersLength));
          }

          var image = responses[b].getAs('image/jpeg').setName(file_name);

          ///Save screenshot to Google Drive
          var folder = DriveApp.getFolderById(driveFolderId);
          var file = DriveApp.createFile(image);
          Drive.Files.update({"parents": [{"id": folder.getId()}]}, file.getId());
          var driveImageUrl = 'https://drive.google.com/file/d/' + file.getId() + '/view';

          /// Insert data into Google Spreadsheet
          var lastRow = SpreadsheetApp.openById(spreadSheetId).getActiveSheet().getLastRow();
          var insertData = [dateAndTime,decodeURIComponent(splitUrlsArr[i][b]['payload']['u']),driveImageUrl]
          SpreadsheetApp.openById(spreadSheetId).getActiveSheet().getRange("A"+ (lastRow+1)+":C"+(lastRow+1)).setValues([insertData]);
      }
    }
  }
}
Press the "Run" button (it is located in the menu bar above the script code).
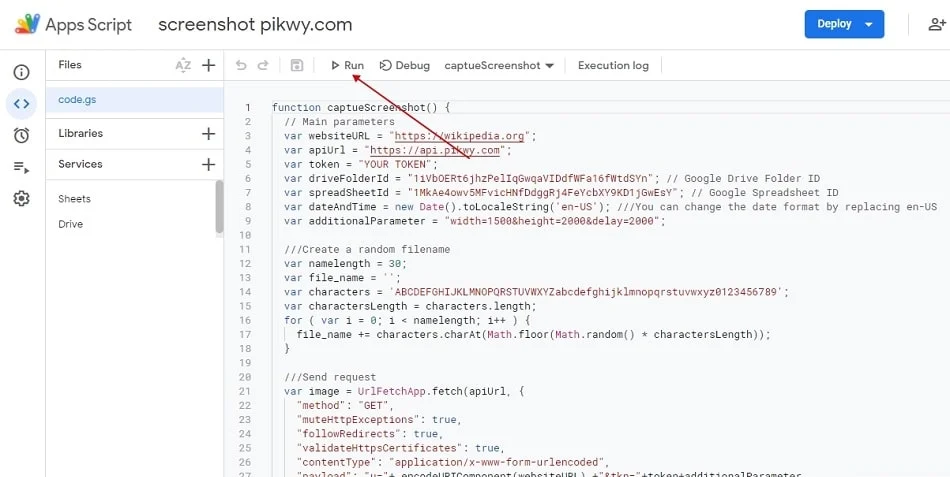
11. After clicking, a window will open to request permission for the script to access the folder on Google Drive and your Google Sheet (to grant access, approve the permission).
Next, the script executed.
12. Done. The screenshot saved in a folder on Google Drive and in Google Sheets (if necessary).
Try it! It is really very convenient and simple.
In addition, if you have any questions, just ask.
We will gladly answer!
Pikwy - screenshot service development team.